上次文章留了个尾巴,免费版的码云gitee pages更新文件后,不会自动重新部署,只有pro版才支持。于是思考怎么自动更新网站。
没想到又一番折腾开始😭
思路
为了自动更新gitee pages,需要模拟用户登录后点击pages页面的“更新”按钮。 有2种方式:
- 抓包看登录、更新接口的api,以及附加的安全参数,通常有cookies、token之类
- 使用浏览器模拟用户操作
平常使用第一种比较多。这次决定使用第二种方式。
selenium
selenium是一个自动化浏览器框架,支持多种浏览器。selenium通过WebDriver操作浏览器。
安装selenium
npm install selenium-webdriver --save
后来发现安装了4.0 alpha。对alpha版不感兴趣,于是改为
npm install selenium-webdriver@3.6.0 --save
安装浏览器和webdriver
浏览器有gui界面,在服务器没有显示器的情况下,是通过headless模式使用。目前chrome和firefox都支持。
# which firefox
/usr/bin/firefox
发现vps上已经有firefox,于是直接使用。查资料发现firefox对应的WebDriver是geckodriver
npm install geckodriver --save
然后从官网拷贝一个简单的例子测试,发现跑不通
Error: The geckodriver executable could not be found on the current PATH. Please download the latest version from https://github.com/mozilla/geckodriver/releases/ and ensure it can be found on your PATH.
    at findGeckoDriver (/root/ycwu/webtest/node_modules/selenium-webdriver/firefox/index.js:354:11)
需要把geckodriver添加到$PATH。后来才发现这里要把geckodriver所在目录添加到$PATH,但是手抖把文件名也粘贴进去了。。。😥
Mozilla官网还特意提醒了
Note: Just to reiterate, the path you add to PATH needs to be the path to the directory containing the drivers, not the paths to the drivers themselves! This is a common mistake.
接着发现浏览器和webdriver有版本对应关系。。。算了,索性手动安装chrome和chromedriver算了
# apt install chromium-browser
# chromium-browser --version
Chromium 75.0.3770.142 Built on Ubuntu , running on Ubuntu 18.04
然后去官网ChromeDriver - WebDriver for Chrome下载对应的driver。
# wget https://github.com/mozilla/geckodriver/releases/download/v0.24.0/geckodriver-v0.24.0-linux64.tar.gz
--2019-08-06 20:45:19--  https://github.com/mozilla/geckodriver/releases/download/v0.24.0/geckodriver-v0.24.0-linux64.tar.gz
Resolving github.com (github.com)... 13.250.177.223
Connecting to github.com (github.com)|13.250.177.223|:443... connected.
ERROR: cannot verify github.com's certificate, issued by ‘CN=DigiCert SHA2 Extended Validation Server CA,OU=www.digicert.com,O=DigiCert Inc,C=US’:
  Unable to locally verify the issuer's authority.
To connect to github.com insecurely, use `--no-check-certificate'.
由于是https且系统没有对应的证书,因此wget要加上--no-check-certificate参数。
wget https://chromedriver.storage.googleapis.com/75.0.3770.140/chromedriver_linux64.zip --no-check-certificate
unzip chromedriver_linux64.zip
然后把chromedriver加入到PATH变量
echo "export CHROME_DRIVER_PATH=`pwd`" >> ~/.profile
echo "export $PATH=$PATH:$CHROME_DRIVER_PATH" >> ~/.profile
source ~/.profile
到此,selenium和webdriver安装完毕。
gitee登录页面分析
chrome按F12,再打开gitee的登录页面
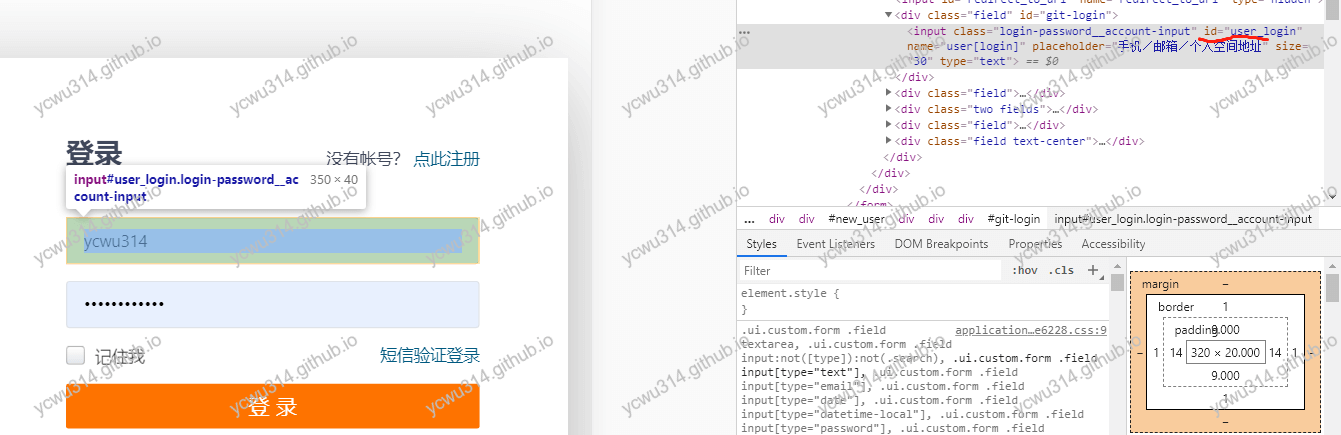
关键点:
- 用户名:id=user_login
- 密码:id=user_password
- 登录按钮:input name=sumbit,有2个。但是由于密码输入框有监听enter按键事件,直接忽略登录按钮。
为了调试方便,我在Windows上开发。
var webdriver = require('selenium-webdriver'),
    By = webdriver.By,
    until = webdriver.until,
    Key = webdriver.Key;

var chrome = require('selenium-webdriver/chrome');
var options = new chrome.Options();
//options.addArguments("--headless");
options.addArguments("--no-sandbox");
// chrome driver要放在PATH
// chrome exe路径
options.setChromeBinaryPath("C:\\Users\\ycwu\\AppData\\Local\\Google\\Chrome\\Application\\chrome.exe");

(async function example() {
    let driver = await new webdriver.Builder().forBrowser('chrome').setChromeOptions(options).build();
    try {
        await driver.get('https://gitee.com/login');
        await driver.findElement({ id: 'user_login' }).sendKeys("<myaccount>");
        await driver.findElement({ id: 'user_password' }).sendKeys("<mypassword>", Key.ENTER);
        await driver.sleep(1000);
    } finally {
        await driver.quit();
    }
})();
这里有几个点要注意:
- –headless:不显示gui。为了调试方便,不启动。等到正式环境再开启。
- –no-sandbox:解决root用户的权限问题,具体和chrome的sandbox机制有关。
- setChromeBinaryPath:因为chrome不在系统PATH,要手动指定。注意Windows的目录分隔符要转义
\\。
由于node是全异步操作,为了实现同步等待,要使用async/await/promise机制,以后再深入了解。
// wait 3 seconds
await new Promise((resolve, reject) => setTimeout(resolve, 3000));
注意await只能用在async方法之内。
selenium选择页面元素,支持id、tag、name、class等选择器。官网看一下就是了。
gitee pages部署页面分析
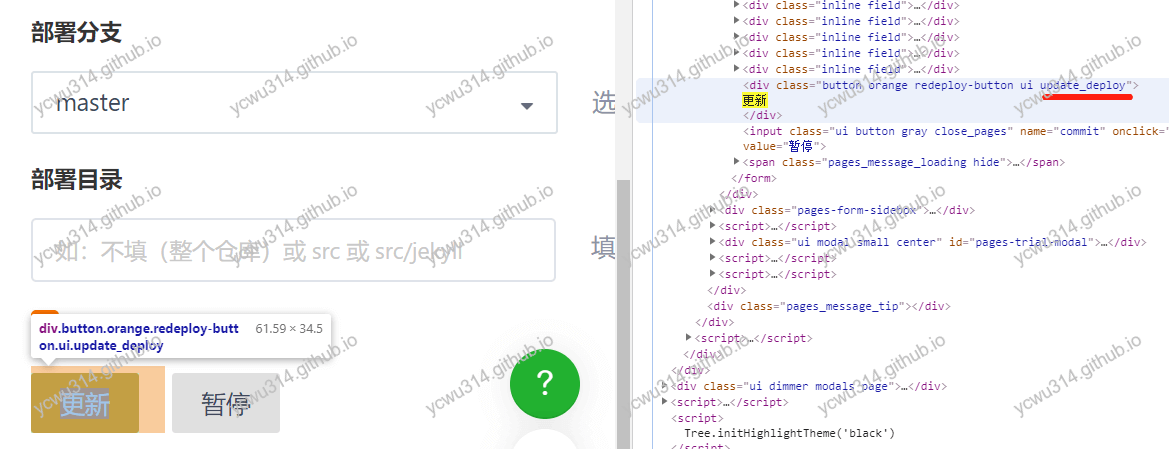
更新按钮没有id,直接写在div。不过试了可以用update_deploy来定位
await driver.findElement(By.className('update_deploy')).click();
结果出现弹窗。。。

见到弹窗莫慌,发现类型是alert,不是自定义模态窗口。selenium轻松解决
await driver.switchTo().alert().accept();
ps. accept()改为dismiss()则是取消。
然后就开始更新静态网站了。
最终windows版脚本
var webdriver = require('selenium-webdriver'),
    By = webdriver.By,
    until = webdriver.until,
    Key = webdriver.Key;

var chrome = require('selenium-webdriver/chrome');
var options = new chrome.Options();
options.addArguments("--headless");
options.addArguments("--no-sandbox");
options.addArguments("--disable-gpu");
// chrome driver要放在PATH
// chrome exe路径
options.setChromeBinaryPath("C:\\Users\\ycwu\\AppData\\Local\\Google\\Chrome\\Application\\chrome.exe");

(async function example() {
    let driver = await new webdriver.Builder().forBrowser('chrome').setChromeOptions(options).build();
    try {
        await driver.get('https://gitee.com/login');
        await driver.findElement({ id: 'user_login' }).sendKeys('<myaccount>');
        await driver.findElement({ id: 'user_password' }).sendKeys('<mypassword>', Key.ENTER);
        await driver.sleep(2000);
        await driver.get('https://gitee.com/ycwu314/ycwu314/pages');
        await driver.sleep(3000);
        await driver.findElement(By.className('update_deploy')).click();
        await driver.sleep(3000);
        await driver.switchTo().alert().accept();
    } finally {
        await driver.quit();
    }
})();
更新travis配置
travis配置要修改的内容:
- travis的addons支持chrome,具体是
google-chrome-stable。 - 把gitee用户、密码分别保存到
gitee_user、gitee_pwd,交给travis托管 - 为了能让node读取到
gitee_user、gitee_pwd,使用process.env.gitee_user - 安装chromedriver,并且设置
$PATH - 把windows版修改为linux版,并且保存到
.travis/deploy_gitee.js - deploy之后,执行
node .travis/deploy_gitee.js
都是体力活,不再重复。
结果
激动人心的时候到了,提交commit触发travis构建。 突然手机响了一下

我擦,traivs服务器在美帝啊,触发异地登录异常验证😭。
不慌,还有一台深圳的开发vps,用来做触发pages更新可以不。。。不可以,还是异地告警。
小结
虽然没有达到目标,但是生命不息,折腾不止!
更新:
2019.8.11:无意中使用xxx的全局流量登录,提示"登录账号验证"

最后一行有惊喜~